

Annual Exhaust Inspection


The beginning of the boating season-the time of year that brings a mix of joy and apprehension for boat owners. All of us are the same, you cross your fingers when uncovering your boat hoping that all your efforts during the winterization process paid dividends. If you are fortunate, you are able to do some light cleaning and general maintenance and off to the lake. If you are unfortunate, you can be in for some time, energy and money to get your boat in tip top shape. While the task can seem daunting, careful examination and inspection of your watercraft at the beginning of the year can result in a long and enjoyable boating season.
For those of you that own an I/O or inboard powered boat, one of the main concerns centers around the condition of the exhaust components. These large cast-iron engine accessories are essential to the proper cooling and exhaust removal on any powerplant. At first glance, these components seem to be simple but they are the end result of a highly engineered production process that is of paramount importance in regards to safety and performance. Because of this, the H2O brand of exhaust products are produced with the following emphasis:
-
1. Products are produced utilizing the latest tooling and an innovative casting process, eliminating traditional casting leak points and ensuring proper cooling and performance.
-
2. Manufactured from a high-grade cast iron material that is continually tested to ensure consistent mix and melt.
-
3. Manifolds are 100% leak tested for unrivaled quality assurance.
-
4. Mounting surfaces are CNC machined and the entire components coated with a baked enamel finish for proper installation and corrosion protection.
-
5. Backed by a 3 YR warranty.
In short, when it comes to choosing replacement exhaust
components, no one offers a better quality choice than H2O;
manufactured by Quality Mark, Inc.
While this is great information, how does that help the
average DIYer when it comes to deciding if the exhaust
components need to be replaced and how to replace
these components if necessary? That is the focus of
this article. We are going to examine the different types
and causes of manifold failures, the resulting damage that
can occur, and most importantly-how to change these
components yourself!
The first step is to physically examine the manifolds and
elbows/risers that are currently in service. Take care to
notice any signs of discoloration or external leaking.
Gasket failures will generally show a trail of corrosion
leading from the manifold/ riser deck surface (Fig. 1),
while any external
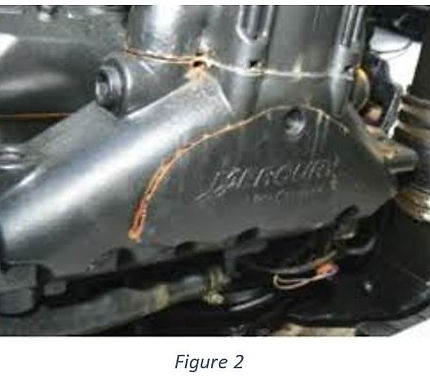
freeze damage will be evident in either loose/distorted
freeze pugs or a cracked or distorted area (Fig. 2).
Once any of these signs are evident it is time to think
about replacing the offending component.
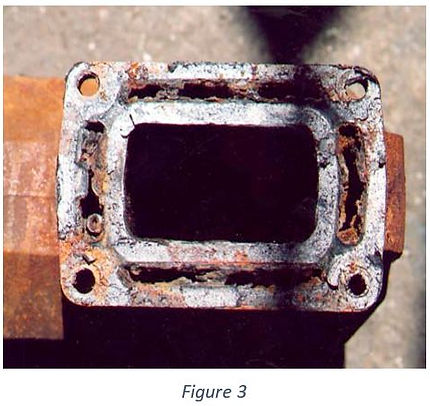
Unfortunately, the other type of exhaust failure is internal
and much more difficult to physically examine. You must
look for the signs of potential failure elsewhere and trace
it back to the exhaust system. Internal cracking or extreme
corrosion (Fig. 3) can result in water intrusion and exhaust
restriction. At the onset, this intrusion can be evident by a
milky look to the engine oil, potential overheating, poor
performance, or a hard start/ turnover condition. If not
caught or allowed to progress, this type of failure can lead
to catastrophic engine damage including seized engines,
bent components, and general motor mayhem and
nastiness. Changing a defective exhaust component
will save you big $$ in the long run.
Luckily, changing the exhaust components themselves is
not difficult. Note I did not say easy because one of the
inherent properties of cast iron is that these components
are heavy. Have no fear, if you eat your Wheaties and follow
some simple guidelines, you can change the components
yourself in a day or at the most, a weekend.
The first and easiest step is the removal of the old
components. Depending upon the application and year
that you are working with, hose routing can either be
minimal or complicated. If possible, take a few digital
pictures of the components and hose routings before
beginning disassembly (Fig. 4). The more information
you document now, the easier it will be to reinstall later.
Remove all the hose connections first, leaving the riser
and manifold in one piece and attached to the cylinder
block. Remember, on inline four and six cylinder
applications special care will be needed as the exhaust
and intake manifold is one integral piece, requiring the
careful removal of the carburetor and related fuel
components as well. Depending upon the strength of
your back or the number of assistants at your disposal,
you can remove the bolts that hold the entire assembly
to the cylinder head and remove all in one piece
(very heavy), or you can first remove the elbow
from the manifold and remove in pieces (still heavy,
but more manageable).
Now that the old components are removed and out of the
boat, place them aside and remove the new components
from the packaging. This is a good time to physically
compare the two to make sure they look to be similar in
overall size and shape. You might notice minor differences
between the components that you removed and the new
components that you are preparing to install. These
differences occur over the production run of OEM engines
as components are refined and upgraded during their
production run. H2O manifold products incorporate the
latest OEM enhancements in all their products so you can
rest assured that you are installing the latest and greatest
regardless of the engine that you are working on.
Once you have determined that the products are correct for your application, now is the time to prepare these components for installation. For quick reference, installation tips are included (Fig. 5). At this time, you should remove the paint from all gasket surfaces and install any required plugs, elbows and drains in the new components. If you are reusing or reinstalling any existing components, all mounting surfaces should be checked and trued at a local machine shop- uneven deck surfaces are the most common and most preventable cause of gasket leakage and failure.
The installation process now becomes an exact reversal of the removal process. Take time to reinstall the components slowly, making sure that all mounting hardware is installed and torqued to factory specifications. All makes and models will have different specifications so consult the proper repair manual for the proper values. Once all the main exhaust components are installed, reconnect all the hoses and any other attached componentry. Now is the perfect time to consult your earlier photographs to ensure that everything is reassembled as required and to double check all connections. A little time reviewing now can prevent an unwanted tow at a later date.
You have now completed the task of replacing your exhaust components. Like all major service, the final step is to test the repair. While you can take the boat to the local lake, it is recommended to perform your first and initial test on the hose. Using an engine flusher, start the engine and allow the engine to warm to normal operating temperature. While doing so, check all the exhaust components and hoses for external leaks. If the engine is leak free and does not overheat, you have successfully replaced your exhaust components.